Format Mac External Hard Drive For Windows And Merge 2 Partitions
If you have previously partitioned your Mac's hard drive in order to download a macOS beta or install Windows, but now you need that storage space back, you can remove the partition and recapture the much-needed space. Here's how.
Getting rid of a secondary partition on the Mac is a two-step process. After erasing a partition, you can then remove it from your system.
Before you start
Feb 08, 2020 How to Partition an External Hard Drive on Mac. If you want to create multiple partitions on your external hard drive (in fact, you should for better file organization), here’s a step-by-step guide: Step 1: Highlight your drive and click “Partition” in Disk Utility. Open the Disk Utility app and highlight your external hard drive.
The most important thing to do before making any changes to your hard drive is to back it up. Time Machine has the easiest way to back up your data if you don't already have a system in place.
How to erase a partition on your Mac
Make sure to restart your computer in your main partition to erase additional ones.
- Open Finder from your dock.
Select Applications.
- Scroll down and open the Utilities folder.
Double-click to open Disk Utility.
- Select the partition you wish to erase.
- Click Erase.
- Click Erase to confirm you wish to erase the partition.
Click Done to continue.
How to remove a partition on your Mac
After following the steps to erase a partition, you can then remove it from your hard drive.
- Select your main partition, which is the first drive on the list. It might be called 'Fusion' or 'Macintosh HD.'
Click Partition.
- Select the partition you wish to remove from the graph.
- Click the minus (-) button.
Click Apply.
Disk Utility will check the disk and make changes. This will take several minutes.
Any questions?
Do you have any questions about how to erase and remove a partition on your Mac? Let us know in the comments and we'll help you out.
U.S. and Afghan forces successfully captured insurgents using an iPhone app
When their specialist kit failed, soldiers turned to an iPhone to get the job done.
- How to format a new hard drive
- How to format an already used hard drive
- How to recover data after mistakenly formatting hard drive without backups
Windows 10 Hard Drive Format Overview
People might need to format a hard drive or an external hard drive in Windows 10 for various reasons. For instance, users want to write data to and read data from, to do a clean installation of the Windows system, to get rid of a virus or malware, to erase the data before giving the drive to someone else or throwing it away, or some other reasons. However, only a few people know how to get the job done correctly. Here, we will introduce you to how to format hard drive in Windows 10 with Windows built-in Disk Management tool, a partition manager, and command lines.
As formatting will delete all the data on the hard drive, make sure that you have successfully backed up your files to another safe place before Windows 10 disk format. Besides, disk formatting is partition formatting, so if you want to format a hard drive, ensure there are partitions on the disk. If you need to format a new hard drive, refer to the following method.
How to Format a New Hard Drive in Windows 10
If you happen to have a new hard drive to format, you'll need to initialize and create a new partition on it before you can format it. When a hard drive doesn't have a partition, it won't appear in File Explorer. But you can find it in the Disk Management, showing with unallocated space.
To properly format a new hard drive, let's start initializing it using Disk Management at first. You can still easily initialize a hard drive/SSD in Windows 10 with a professional partition management software.
Step 1. In Windows 10, press 'Windows + R' key, type diskmgmt.msc and click 'OK' to open Disk Management.
Step 2. Right-click the hard drive or SSD marked as 'Unknown' and 'Not Initialized,' and select 'Initialize Disk'. If the disk shows as Offline, first right-click it and select 'Online'.
Step 3. In the Initialize Disk dialog box, check the disk to initialize. And then click 'OK' to accept the default partition style, or you can change the partition style (GPT or MBR) as you want.
- Master Boot Record (MBR) is for hard drives smaller than 2TB in size.
- GUID Partition Table (GPT) is for hard drives larger than 2TB in size.
Step 4. Find the initialized disk, right-click the Unallocated space, and select the 'New Simply Value' option. Then, follow the on-screen instructions to choose a volume size, assign a drive letter, select NTFS as the file system, and finish other settings.
Step 5. Check the 'Perform a quick format' option. Then, click the 'Next' > 'Finish' button. Depending on the size of the drive, it can take some time to finish. When the process completes, your new hard drive will be initialized, partitioned, and properly formatted.
How to Format an Already Used Hard Drive
If you have a hard drive or an external hard drive already organized with partitions, you can format the existing partition to remove its content and start fresh with a clean drive. We cover the three most popular ways to format a partition, like displayed below. Choose the one that works best for you.
Format Hard Drive with Windows Disk Management
Windows 10 offers users a built-in disk management tool to create, delete, extend, shrink, and format partitions.
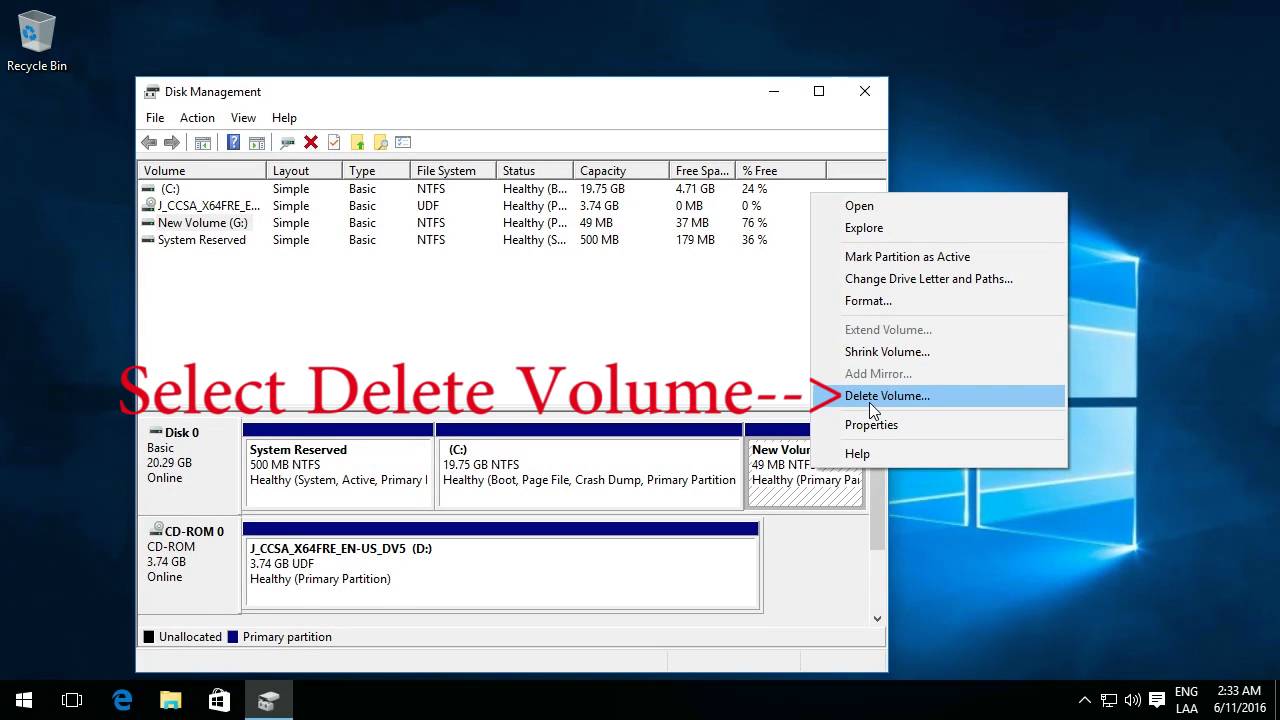
Step 1. Type Control Panel in the search box. Click 'Control Panel' > 'Administrative Tools' > 'Computer Management' > 'Disk Management'.
Step 2. Right-click on the target drive or partition and click on 'Format'.
Step 3. Watchtower library 2016 mac. Select the file system and set the cluster size.
Step 4. Click 'OK' to format the drive.
Format Hard Drive in Windows 10 with EaseUS Management Software
EaseUS partition software is a popular disk partition management tool that is available for all hard disk related jobs such as format disk partition, extend system partition, settle low disk space problem, convert MBR to GPT without data loss and vice versa. You can try it whenever you failed to do the Windows 10 disk format job with the Windows disk management tool.
Step 1: Run EaseUS Partition Master, right-click the hard drive partition you intend to format and choose 'Format'.
Step 2: In the new window, set the Partition label, File system (NTFS/FAT32/EXT2/EXT3), and Cluster size for the partition to be formatted, then click 'OK'.
Step 3: Then you will see a warning window, click 'OK' in it to continue.
Step 4: Click the 'Execute Operation' button in the top-left corner to review the changes, then click 'Apply' to start formatting the partition on your hard drive.
Smaller cluster size makes less wasting of disk space. The smaller cluster size is, the bigger the file allocation table (FAT) will be. The bigger the FAT is, the slower the operating system works with the disk.
Format Hard Drive with Diskpart in Command Prompt
Step 1. Type cmd in the search box. Right-click on Command Prompt and choose 'Run as administrator'.
Step 2. On the Command Prompt black window, type diskpart and press 'Enter'. Then, type the following command lines in order.
- Type list disk and press 'Enter'. All the disk drives will be listed, including your external drives.
- Type select disk + disk number, for example, select disk 1 and press enter.
- Type clean. This step starts to clean up all files and folders on the selected hard disk.
- Type create partition primary and press 'Enter'.
- Type format fs=ntfs (or format fs=fat) and press 'Enter'.
- Typing assign to assign a drive letter to the newly created partition.
All the three ways above can help you format a used hard drive or external hard drive in Windows 10, but if you want to have a long-term and comprehensive solution that can help you manage your disk easily, we highly recommend you try EaseUS Partition Master. After you get to know this product, you will be very satisfied with it.
How to Recover Data from Formatted Hard Drive
Misformatting hard drive occurs from time to time. Although we know that formatting is not like erasing, which doesn't erase the data on the disk, only the address tables, there is no way to recover data from a formatted hard drive unless resorting to a professional data recovery tool.
Therefore, suppose you accidentally format a disk without a backup and want to recover its data, you can use EaseUS Data Recovery Wizard for help. This top-notch file recovery software enables you to quickly and simply restore lost data because of hard drive formatting, emptying recycle bin, partition loss, OS crash, virus attack, and more. It is capable of recovering permanently deleted files at a high recovery rate.
Now, download this robust data recovery program and recover data after formatting hard drive.
Step 1: Choose the partition
- Launch EaseUS formatted data recovery software after the installation.
- Choose the hard drive which you've accidentally formatted.
- Click 'Scan'.
Step 2: Initiate the scan process
- Start scanning lost data all over the hard drive.
- Proceed with the data searching. You'll see more and more data showing up in the scan results.
Step 3: Recover files to a secure location
- After the scan, browse data in each section, especially in 'Lost Partition Files'. It's a highlighted feature of EaseUS Data Recovery Wizard for retrieving data from a formatted hard drive partition.
- Select the data files you wish to recover.
- Click 'Recover'.
Instead of the original hard drive, choose a different location to save the recovered data.
Elcomsoft iOS Forensic Toolkit Crack supports jailbroken 64-bit devices (iPhone 5s and newer) running most versions of iOS 7 through 12. Logical Acquisition with Keychain Extraction iOS Forensic Toolkit Crack supports logical acquisition, a simpler and safer acquisition method compared to physical. Logical acquisition produces a standard iTunes-style backup of information stored in the device. The release of macOS Catalina brought the usual bunch of security updates. One of those new security features directly affects how you install Elcomsoft iOS Forensic Toolkit on Macs running the new OS. In this guide we’ll provide step by step instructions on installing and running iOS Forensic Toolkit on computers running macOS 10.15 Catalina. Note: on macOS Catalina, you must use iOS Forensic Toolkit 5.11 or newer (older versions may also work but not recommended). Elcomsoft iOS Forensic Toolkit with serial allows imaging devices file systems, extracting device sheets and accessing locked devices via lockdown records. The process is divided into steps that include physical acquisition, logical acquisition, media, and files. Elcomsoft iOS Forensic Toolkit Crack supports jailbroken 64-bit devices (iPhone 5s and newer) running most versions of iOS 7 through 12. Logical Acquisition with Keychain Extraction. IOS Forensic Toolkit Crack supports logical acquisition, a simpler and safer acquisition method compared to physical. The Elcomsoft iOS 5.0 Crack forensic toolkit, as the name suggests, is a software application that performs the logical and physical acquisition of iPhone, iPad and iPod touch devices. An image device file system, extract device secrets (passwords, encryption keys and protected data) and decrypt the file system image.